- Home
- Holiday Cookies
- Christmas Cookie Decorating Ideas
Christmas Cookie Decorating Ideas: Easy to Advanced
Christmas cookies are supposed to be fun!
Christmas cookie decorating is one of my favorite times of year. (Could it be because of my b-day on the 24th?) There are so many ways to decorate Christmas cookies, from simple cookies that anyone can make to detailed designs that will keep a serious cookie decorator happily piping for hours.
Whether you're brand new to decorating sugar cookies or you're ready to try something a little more challenging, I've gathered some of my favorite Christmas cookie ideas right here.
And because I always like to give you more than expected, there are a few cookie-cutter flips, decorating tricks, and videos along the way. That's what makes WeCookiers, well, WeCookiers. 😊
What You'll Find Here
1. More Christmas Cookie Inspiration
2. Easy Christmas Cookie Ideas
3. Christmas Cookies for the Intermediate Decorator
4. Christmas Cookies for the More Advanced Decorator
5. Christmas Cookie Decorating Techniques
6. Christmas Cookie Tips & Tricks
7. More Christmas Cookie Inspiration
What You Need to Decorate Christmas Cookies
Before we get to the fun stuff, let's talk about what you'll need to decorate your Christmas cookies.
Most people probably already have most of the basics on hand. If you're new to cookie decorating, don't worry—you don't need a kitchen full of fancy equipment to get started, luckily.
At the very least, you'll need baked sugar cookies, royal icing, decorating bags, food coloring, and a few basic decorating tools. From there, you can add the fun specialty tools and supplies as you discover what you enjoy using. We cookiers each have our own preferences.
My Basic Cookie Decorating Supplies
Easy Christmas Cookie Ideas
You don't have to be an expert cookie decorator to make beautiful Christmas cookies. Some of my favorite holiday cookies are actually the simplest ones to decorate. You will find this to be true, too.
These designs are perfect if you're new to cookie decorating, short on time, or just want something festive without spending hours on every single cookie.
And remember, “easy” doesn't mean boring! A few simple shapes, colors, and decorating techniques can turn a basic cookie into something that looks pretty doggone impressive.
A Whole Christmas Cookie Collection with Just Four Colors
Let's start with some festive designs that don't require a sleigh full of decorating skills!
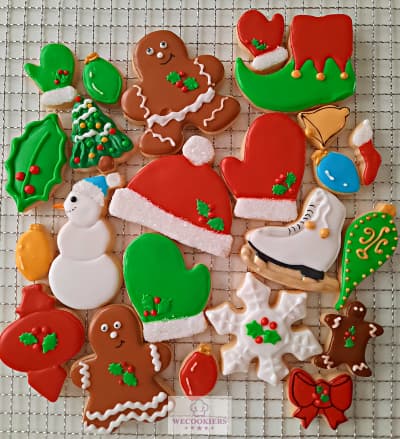
Who says you need a rainbow of icing colors to make a beautiful Christmas cookie platter? This collection includes 10 full-size cookies and about 10 minis, all decorated with just four easy colors!
With a little creativity, you can make a whole assortment of festive cookies that look lovely together without making a mountain of different icing colors. And those minis? They're perfect for adding variety to your platter!
The beauty of this set is that you only need two icing consistencies: flood and medium. Want to make things even easier? Add some store-bought decorations and let them do some of the work for you!
Christmas Tree Cookie
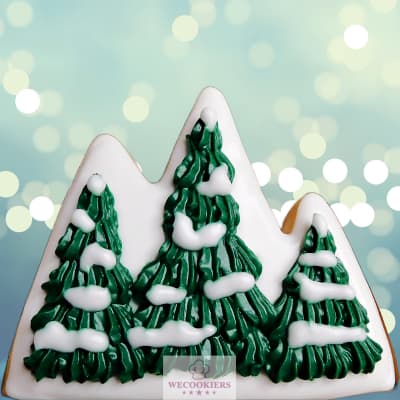
Here's a fun little cookie-cutter flip that makes decorating Christmas trees surprisingly easy. Take a mountain-shaped cookie cutter, and suddenly you've got a whole forest of Christmas trees!
You can keep these super simple by piping the outline of a triangle and flooding it with royal icing. Add a little white icing for snow, and you're done.
Sometimes you get lucky, and the easiest Christmas cookie ideas are hiding in the cookie cutters you already have. That's why I love a good cookie-cutter flip. The surprise flips are the best!
Santa's Toy Bag Cookie
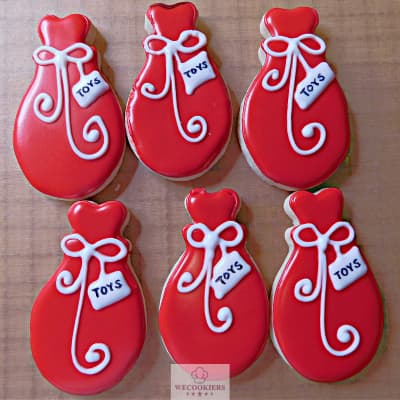
This cookie is another example of looking at a cookie cutter a little differently. What looks like a turkey leg can become Santa's toy bag with just a few simple decorating changes!
A little red royal icing, some white for the rope, and a tag hanging from the rope that says ‘Toys’ turn this Thanksgiving shape into a fun Christmas cookie.
Don't be afraid to look at your cookie cutters with a little imagination. Think outside the box. You may just have a Christmas cookie hiding in there that you never knew about! Oh Joy!
Easy Christmas Cookie Ideas — Rudolph
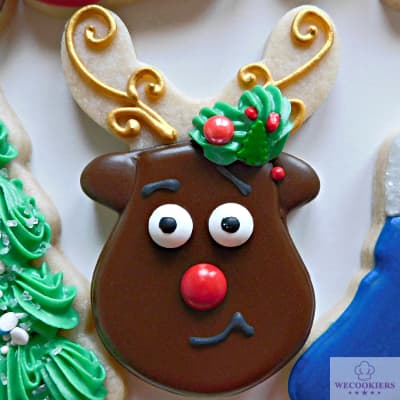
Rudolph is one of those Christmas cookies that look more complicated than they really are. Trust me on this. A little red nose, some antlers, and a few simple details are all it takes to turn a basic reindeer cookie into everyone's favorite famous reindeer. You know. The one that all the other reindeer used to laugh at and call names.
The trick here is keeping the details simple. Once your base icing has crusted, add the antlers, eyes, and that bright red nose that guides Santa’s sleigh. Suddenly, you've got Rudolph!
And let's be honest... every Christmas cookie collection needs a Rudolph. ❤️
Frosty the Snowman Cookie
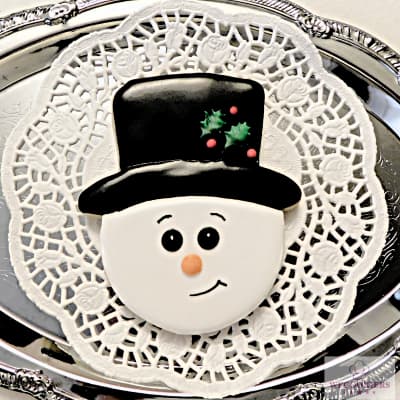
The Frosty head is another simple Christmas cookie that packs a lot of snow, er, I mean personality. A snowman head, some white royal icing, and a few little details are all you need to bring him to life.
He was made of snow, but the children know that once the white icing has crusted, you can add his eyes, button nose, and mouth. If you’re really artistic, go ahead and add his corn cob pipe. Then, of course, he needs his old silk hat. That's what turns a plain snowman into Frosty. Be careful with the hat; he may decide to start dancing around!
And don't forget his carrot nose. You can pipe the little carrots as royal icing transfers beforehand, so they're ready to grab. Then you wouldn’t be ‘thumpetty thump thumping’ your fingers on the table wondering what to use for the orange nose. After all, he wouldn't be Frosty without it! ☃️
Christmas Stocking Cookie
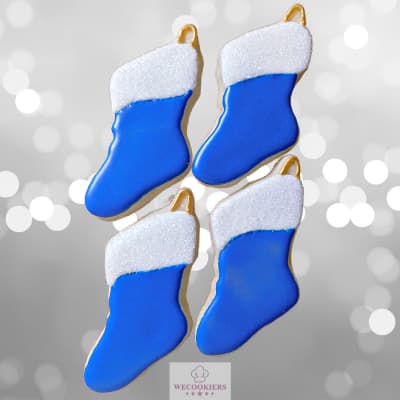
Christmas stockings are one of those cookies where you can let your imagination run wild. Once you've flooded the stocking with your base color, the decorating possibilities are endless. That’s been said many times, many ways!
Add a fluffy white cuff, then decorate it with stripes, dots, swirls, snowflakes, or whatever makes you happy. You can even personalize each stocking with a name. There really isn't a wrong way to decorate a Christmas stocking!
And so, I’m offering you this simple phrase, from kids from 1 to 92: The wet-on-wet technique comes in handy with these. With just 2 colors, you can make gorgeous simple cookies using a toothpick or scribe.
And if you're making a bunch of cookies, this is a great one to let everyone decorate their own. Just put out the icing and sprinkles and let the Christmas cookie decorating begin!
Santa Boot Cookie
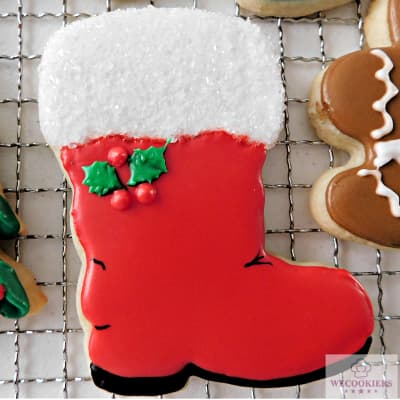
What are Christmas cookies without the Santa boot? This shape does most of the work for you. With just 3 colors, you’ve got it. I like to pipe the bright red boot part first and let it crust. I then add the fluffy white cuff on top of the layer of red for a more 3-dimensional look. Next, the black sole. If you are afraid of color bleed, you can pipe the sole white, let it dry, and then color it black with a food color marker. I love the little creases on the boot and draw those with the black food marker. And last, I enjoy adding holly and berries for a finished, more festive look. Guess what? You now have a cookie that screams Christmas!
You can keep it simple or add more detail. I also like to pipe the white and add sparkly sanding sugar, too.
However…
Sometimes simple really is better.
Now all you need is Santa to fill those boots on Christmas Eve! 🎅
Christmas Cookies for the Intermediate Decorator
As we go a-caroling along we are ready to move beyond the simple stuff. These Christmas cookie ideas require a little more piping, layering, and attention to detail.
But…
…you still don't have to be a cookie-decorating pro to tackle them, and those little North Pole workers won't be looking over your shoulder!
This is where you can start playing with different royal icing consistencies, adding dimension, and combining decorating techniques. Take your time, let your icing crust when needed, and don't be afraid to give it a go.
Remember, your cookie doesn't have to look exactly like mine. That's the beauty of cookie decorating—you can take an idea and make it your own!
More Christmas Cookie Ideas to Inspire You
Ready to add a few more techniques to your cookie-decorating toolbox? Let's go!
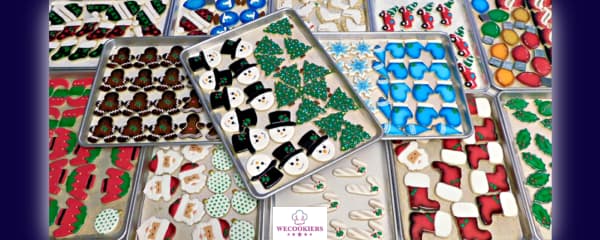
Santa has brought an entire sleigh-full of cookie inspiration! This collection features 19 different Christmas cookie designs displayed on 13 half-sheet trays. You'll find plenty of ideas to spark your creativity, whether you're looking for new shapes, color combinations, or decorating techniques to try.
Take a good look and see which ones get your cookie-decorating lights blinking!
Christmas Tree Cookie

Now here's where we start having a jolly good time with our cookie cutters! This Christmas tree was morphed from two different cookie cutters (a plaque cutter and a unicorn horn) to create a more interesting tree shape. Who says you have to use a cookie cutter exactly as it comes? Check out my Cookie Cutter Flips page to learn how to morph.
Once you have your new tree shape, you can keep the decorating fairly simple and let the lettering become the star of the show. Add a Christmas word, a name, or even a little holiday message. A basic tree suddenly becomes something completely different with just a little imagination.
This is one of my favorite things about cookie decorating—taking something ordinary and giving it a little twist. You might just look at your cookie cutters differently after this one!
Snowman in a Globe Cookie
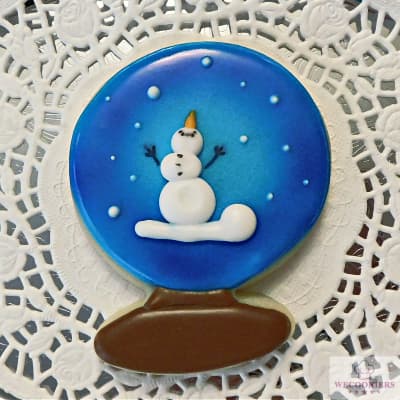
Start with the globe and let that icing crust before adding the snowman. Tip: Either let each of the 3 balls of the snowman crust so the icing doesn't run together, or use 12-14 second consistency icing...not figgy pudding consistency!
No face on this jolly little guy, just a carrot nose on the top so he's looking up at the snow. By letting each layer crust before adding the next, you can create dimension that makes the snowman pop right off the cookie, don't you agree?
Let me pause and give you some tips:
- I use 12-14 second icing for the snowman.
- Build the snowman so each ball of the body is offset. This gives him so much character and makes it look like he's really bending his body.
- Add just a carrot for his nose on the very top of his head. It gives the idea that he's having fun looking up and dancing!
The last thing I do is add airbrushing. It's not a must if you don't have one, but it certainly gives great depth. Ms. Claus loves making hers this way.
This is one of those designs where patience pays off. Give each layer time to do its thing, and you'll end up with a cookie that has a lot more depth than you might expect.
The biggest tip here is using a food dehydrator to crust each layer.
And who doesn't love a sweet snow globe at Christmas? Except this one doesn't need shaking to make it snow! ☃️❄️
Merry Christmas Plaque with Red Roses
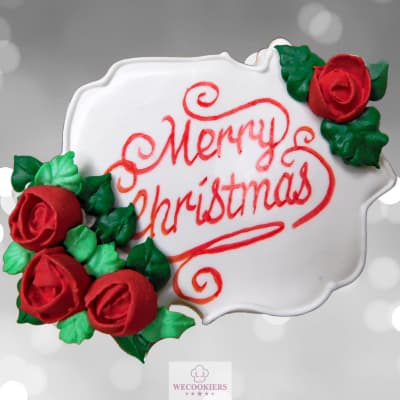
Here's where lettering and a little floral work can take a simple plaque cookie to the next level. The shape itself is pretty basic, but once you add the “Merry Christmas” lettering and those gorgeous red roses, you've got yourself a Christmas cookie that looks anything but basic.
The trick with a design like this is to give each element its own space. Get your lettering where you want it first, then add the roses and greenery around it. You don't need to fill every little bit of the cookie to make it beautiful.
And those roses? They're not nearly as intimidating as they look. Here is one of my YouTube videos showing how to pipe them:
You could also just pipe holly and berries to make it even more festive!
What’s the fun part we discovered with the snowman? That's right. Little steps are built upon each other to create a really special cookie. Let’s keep going. Santa will be so proud of you!
Blue Christmas Tree Light Bulb Cookie
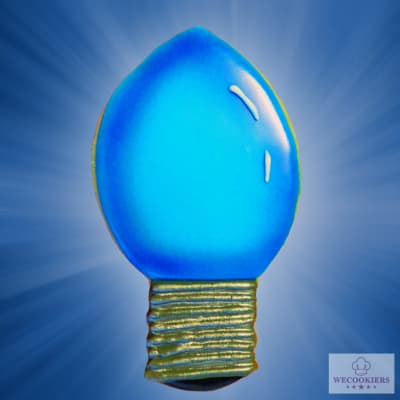
Now here's a cookie where airbrushing really gets to show off. This Christmas tree light bulb starts with a gold metallic base that gives the cookie a beautiful glow before the blue icing and details are added.
A few tips to start:
- Begin by piping the base with a deviled egg or gold gel color. I use AmeriColor because of their vibrant colors.
- After it has crusted, use a medium-consistency icing in the same yellowish color to pipe the screw lines. This keeps the lines firm on top of the base for the 3-dimensional look.
- The color yellow determines the final metallic gold color. I like a darker color to make the gold more prominent when applied.
- Why start with the base? You will be painting the base gold, or, if you prefer, silver with a gray base. When doing so, it's easy to get the gold luster dust on the bulb part. This makes for a much neater finished product.
Then pipe on the sky-blue icing. Once crusted, I use royal blue AmeriMist airbrush color and go around the sides of the bulb. By keeping the center clean of the airbrush, it makes the bulb look like it is glowing.
I like to pipe a little white curve on the side of the bulb and sometimes add Christmassy florals. The combination of blue, gold, and a little shine turns a fairly simple shape into a cookie that really catches your eye.
There's nothing like airbrushing to make your cookies look professionally decorated. It adds so much depth. With this particular cutter, it makes it look quite real, too. Let's go rock around the Christmas tree with these techniques!
There are 2 kinds of airbrushes. I have them both and use them each depending on whether I have a huge order or a small one. Here are the ones I couldn't part with!
The cordless...

- Airbrush with battery
- USB faster charging & longer working time
- Package includes 1 liquid extraction dropper, 5 spray gun cleaners, 5 wash needles, 3 capacity cups, USB charging cable, a user manual, and a pink art airbrush gun
This is a super buy, as you get 3 airbrushes, a hose, a compressor, etc. The compressor, which, by the way, is very quiet...
-3 airbrushes with compressor
-dual and single-action airbrushes
-6’ braided hose and a compressor-mounted airbrush holder for 2 guns
--Read more benefits
Christmas Sweater Cookie
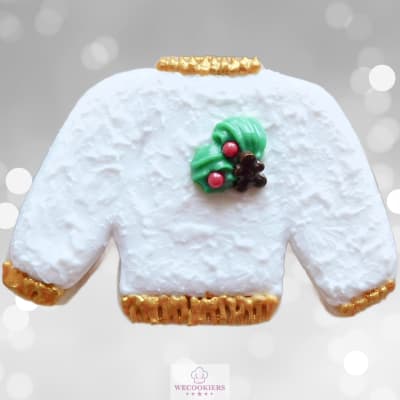
Here's a fun one they use at the North Pole! This Christmas sweater is plain white, but it has a fuzzy texture that makes it look soft and cozy. But hey, use whatever color your little heart desires. And the best part? The technique is surprisingly easy.
The trick is stippling. Simple. Flood the cookie with your base icing. After it has crusted well, pipe a very light layer of icing on the cookie, then take a paintbrush and dab it all around. You don't want a thick layer. Keep the piping very light and don't use much icing. The paintbrush needs to stay pretty dry.
The little peaks and bumps create a soft, fuzzy look that makes this plain white sweater look like something you'd actually want to snuggle up in. A great gift for Santa when he finally arrives home late Christmas night! 🎅
This is a great technique to have in your cookie-decorating toolbox because you don't need a fancy design to make the cookie interesting. The texture does all the work for you.
It's a great technique for:
- Furry animals
- Baby clothes
- Wedding cookie backgrounds
Once you try stippling, you may find yourself looking at all kinds of cookie shapes and thinking, Hmmmm... I wonder if I could make that fuzzy? 😊
Candlestick Cookie
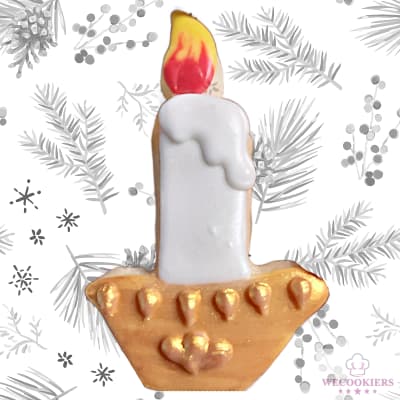
Here's another cookie where a few simple layers can make a big difference. This candlestick uses both layering and the wet-on-wet technique to give it a little more dimension and a whole lot of Christmas charm.
Like the tree light bulb, we start at the bottom. Gold is the perfect color for Christmas, so I am making the candleholder gold. Remember? We do this first because we will paint this color before doing the candle to avoid metallic smears. Besides, it’s the way the cookie elves taught me, and it’s just easier this way.
Here are the steps (crusting between each):
- Candleholder, as mentioned above.
- Candle. Crust. Add a little more white to make the candle look like it’s melting. Crust.
- Flame. Pipe red for the flame and immediately add yellow and orange before it crusts. Run your toothpick or scribe through it to make it look like a flame. This is called the wet-on-wet technique. Those little elves are pretty ingenious, huh?
The trick is knowing when to let your icing crust and when to work while it's still wet. Once you get the hang of that, layering and wet-on-wet become two very handy tools in your cookie-decorating toolbox.
And look at that candlestick! A little icing, a few layers, and you've got yourself a Christmas cookie that's anything but plain. 🕯️
Now Mrs. Claus can see her way through the house at night to see if there is a creature stirring—or even a mouse! 🐁
Snowflake Cookie
Hey, hey, hey snowflake. My pretty little snowflake 🎶…
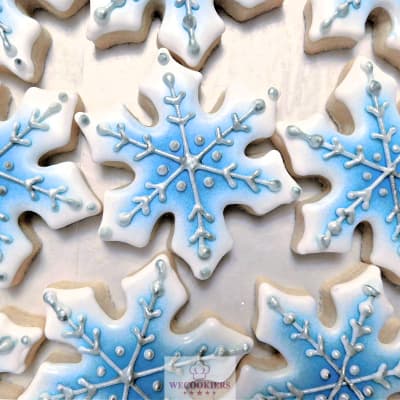
This snowflake uses a little AmeriMist sky blue airbrushing in the center and a few simple layers to create a beautiful, baby, it’s cold outside feel.
Easy steps:
- Start with your base icing and let it crust.
- Airbrush the center area lightly with sky blue to add that beautiful shaded, frosty look.
- Pipe the snowflake details—a line crossing the width with two little arrows on each.
- Once nice and dry, pipe the lines silver.
The best part? You don't need a whole lot of fancy piping to make this one beautiful. The airbrushing does a lot of the heavy lifting!
So, if you have an airbrush sitting around waiting for you to get brave enough to use it, this is the time to try it. Give it a go—you might just surprise yourself! ❄️
Now we can sit back and let it snow, let it snow, let it snow!
Green Bauble Ornament Cookies
O Christmas tree, O Christmas tree… 🎶
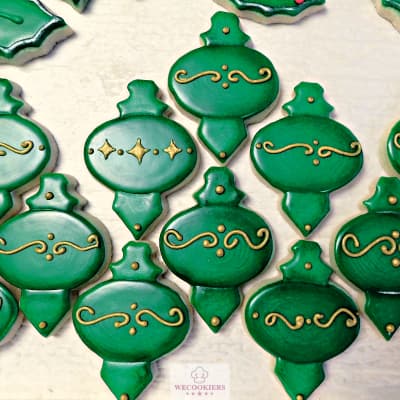
Okay, these little baubles are simple, elegant, and oh-so-Christmasy! I made this set in leaf-green-colored royal icing and added metallic gold scrollwork piping to dress them up.
Start by flooding each ornament with green icing. After that is crusted over well, use that wonderful tool, the 'ole airbrush, and do some perimeter shading in a forest-green color. This really makes them pop!
Next, pipe your designs in AmeriColor's Deviled Egg gel color to deepen the gold metallic. This is where you can have some fun! Use different lines, swirls, dots, or whatever design makes your little cookie-decorating heart happy.
The metallic gold gives these simple ornaments a little something extra without making them difficult to decorate.
And because these are ornaments, you can make each one a little different. Hang them on your Christmas tree—or, better yet, put them on a cookie platter where nobody needs a ladder to admire them! 🎄✨
Pro tip:
Pipe the stems of the bauble first and let it crust before piping the center part. Doing this breaks up the monotony of the icing and gives it a more realistic look.
Christmas Cookies for the More Advanced Decorator
Ready to take your Christmas cookies up a notch? 🎄
Well, hang on to your piping bags, because we're moving into some designs that ask for a little more skill, a little more patience, and maybe a few extra cookies to practice on. Hey, even Santa doesn't get everything right on the first try!
These cookies bring in techniques like airbrushing, metallic finishes, added dimension, and texture. It's those little details that can take a cookie from “Oh, that's cute!” to “WOW! You made THAT?”
But don't let that piping bag quiver! You don't have to master everything at once. Some of these designs build on cookies you've already decorated in the earlier sections. You'll see how adding a few new techniques can transform a familiar design into something really special.
And if you're selling your cookies, you'll see how those extra details can help take your work—and your pricing—to the next level. So, let's roll up our sleeves, add some flour to your forehead (just to prove you’re workin’ hard), and have some Christmas cookie fun!
Buffalo Plaid Bow Cookie
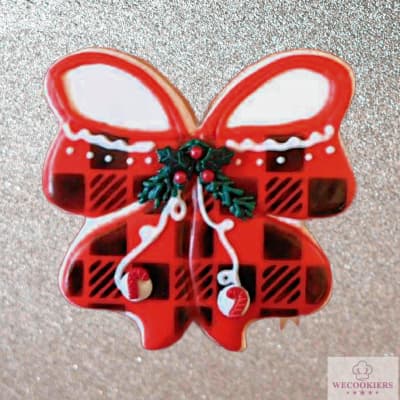
Now we're getting into the fancy stuff! This big red bow looks impressive, but the real showstopper is the black buffalo plaid airbrushing.
With all my bows, I like to add depth, so I start with an all-white base flood. Once crusted, I add the red on top in the shape of the bow, leaving the hollows at the top, again, for more dimension. Let that crust well. We don't want the stencil ruining the beautiful flood.
Then it's time for the airbrush. The black buffalo plaid pattern gives this bow so much depth and personality. And does buffalo plaid say Christmas, or what? Once the plaid is in place, add the white piped, curly ribbon to make the bow really stand out.
Now comes the fun part—dress that bow up! Add greenery and berries, then finish it off with little candy cane decorations. (I chose to use mini store-bought ones on this one.) Because apparently one Christmas decoration wasn't enough! 🎀
The combination of the red bow, black plaid, white ribbon, greenery, berries, and candy canes makes this cookie look like a whole Christmas package wrapped up in one cookie, doesn't it?
This is a great example of how airbrushing can take a cookie from pretty to wow! Don't be afraid to layer several decorating techniques on one cookie. That's where the magic happens.
From now on, your troubles will be out of sight… 🎶
Black Christmas Ornament Cookies
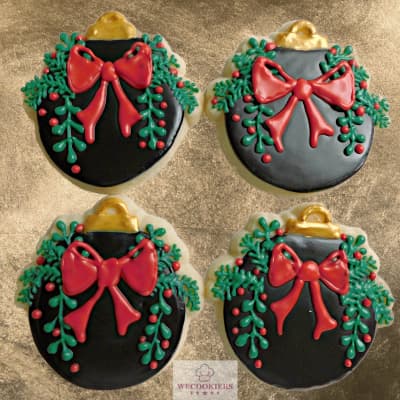
Now we're talking Christmas bling! This set of four round ornaments starts with a black base, which makes all those Christmas colors really pop.
As we have previously done, let's start with the top and pipe a yellowish color to be covered with edible gold metallic luster dust. That against the black is what really makes these cookies shine! Done? Let's get to the black now.
Once the black icing has crusted, it's time to start dressing these little ornaments up. Add plenty of greenery and berries. Those little North Pole workers are behind this year, so we all need to chip in and help!
And because we apparently still aren't done decorating, add a big red bow to each ornament. 🎀
I love how the black background makes the greenery, berries, gold, and red really stand out. Sometimes going with an unexpected base color can make all the difference.
With a set like this, you can also have fun making each ornament a little different while keeping the same color palette. They don't have to match perfectly to look like they belong together.
These are definitely not your everyday Christmas ornaments. They're more like the ones that show up to the Christmas party wearing their fancy clothes! ✨
Buffalo Plaid Mitten Cookies
I don’t want a lot of Christmas. There is just one thing I need 🎵…
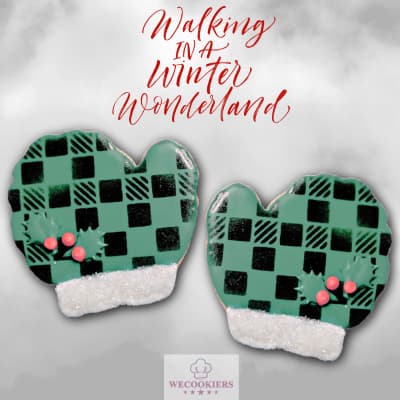
One more spin for a cookie-cutter flip to the tune of a Thanksgiving shape... You guessed it, a turkey! Yep, you read that right. A full-body turkey becomes a pair of cozy-looking green mittens with a little imaginative Christmas spirit.
Start by flooding the mittens with green royal icing. Once crusted, use the airbrush to add the black buffalo plaid. I love how the plaid gives these mittens a warm, cozy feel. Let’s warm those little fingers up…
For the cuffs, flood them with white icing and dip (or sprinkle) them in sanding sugar while the icing is still wet. That gives them that fluffy, snowy look without having to actually knit anything. This way those little elves won’t needle you!
To make a matching pair, simply turn one of the turkey cookies over. Just like that, you've got a left and a right mitten!
Finish them off with a little greenery and berries, and you've got yourself a pair of Christmas mittens that nobody would ever guess started out as turkeys.
Now that's what I call a cookie-cutter flip! 🧤🎄
Santa Boot Cookie — Taken to the Next Level
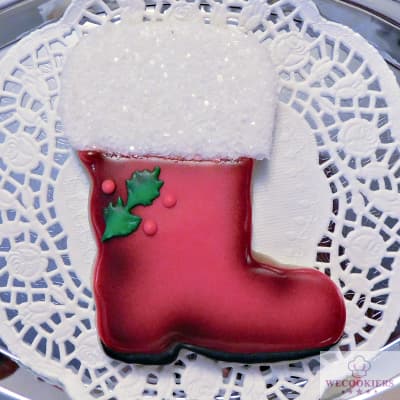
Remember our simple Santa boot from the Easy section? Well, look what happens when we take that same basic cookie and add a little more technique!
This version is airbrushed, which adds shading and depth that you just can't get with a simple flood. Suddenly, that little Santa boot has a much more polished, professional look. This is what Santa’s snazzy Christmas party boots look like!
This is a great example of how you can take a design you've already mastered and keep building on it. You don't necessarily need a completely different cookie—you can add techniques that take the same idea to the next level. By paying attention to fine detail, you can make natural-looking creases in the boot and even make the boot look worn and dirty. Hey, Santa has to do a lot of trekking in mud, too! Just imagine the miles he walks.
And this is important…
…if you're selling your cookies, this is where those extra techniques can make a difference. More detail, more time, and more skill can justify a higher price. This is where you can Ho-ho-ho down to the bank! 🎅
Snowman in a Globe — Taken to the Next Level
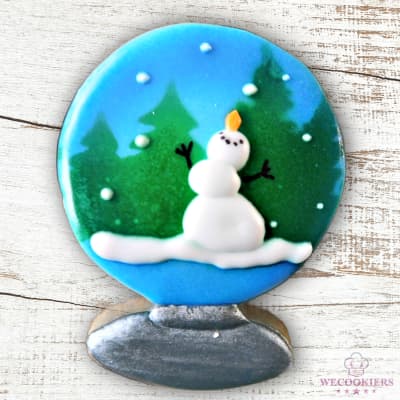
Remember our little snowman in a globe from the Intermediate section? Well, let's take him up a notch!
This version has airbrushed evergreen trees in the background, giving the globe a whole winter scene instead of just a snowman floating around in there. He’s standing on a blanket of snow, which adds even more dimension to the design.
And look at that globe base! The metallic silver gives it a beautiful, polished finish that really makes the whole cookie feel a little more special, as if his cheesy happy smile wasn’t enough.
This is another great example of how adding a few techniques can completely change the look of a cookie. Airbrushing, metallics, and a little extra dimension can take a familiar design from simple and sweet to something that looks like it belongs in a fancy Christmas cookie collection.
And that's the fun of taking your cookies to the next level. You don't have to start from scratch—you just keep adding to what you already know. ☃️❄️
We’ll frolic and play, the snowman (er, Eskimo) way… 🎵
Here are the airbrush colors you will need. AmeriMist by Americolor is super too!
- AmeriMist air brush colors are super strength, highly concentrated spray-on air brush food colors
- Extremely effective, even on hard-to-color non-dairy whipped toppings and icings
- 12, .65 ounce flip-top bottles
Antique Truck Christmas Cookie — Taken to the Next Level
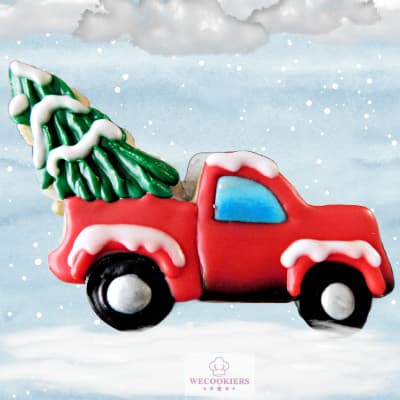
Now this is what I call taking a cookie to the next level! This antique truck hauling home a freshly cut Christmas tree has a lot going on—and that's what makes it so much fun.
There are lots of colors and details in this one, but it's the little touches that really bring the cookie to life.
I used the airbrush to make the undercarriage look a little dirty, because let's face it, this truck has been out doing some serious Christmas tree hauling! I also added a little airbrushing to the side window to give it more depth.
Then comes the snow. Snow on the fenders and across the top of the truck makes it look like this old truck has been out in the winter weather doing exactly what an old Christmas truck should be doing.
Now look at that tree! I used a star tip to pipe the tree, which gives the icing the look of pine needles. Add a little snow to the branches, and suddenly that tree looks like it was just cut, loaded into the truck, and ready to plant in your living room.
And we can't forget those metallic silver hubcaps. A little shine in just the right place adds another touch of realism.
This cookie is a great example of how layering techniques, colors, texture, airbrushing, and metallics can transform a cookie into a little Christmas scene from old that tugs at the ‘ole heart.
And that's really the whole point of taking your cookies to the next level. It's not just about adding more stuff—it's about adding details that make the cookie come alive. 🚚🎄❄️
I'd say this old truck is ready to head home for Christmas.
Although it’s been said many times, many ways, Merry Christmas to you!
Christmas Cookie Decorating Techniques
These jolly decorating techniques can help you add detail, dimension, and a little extra Christmas soul. You don't have to use every technique on every cookie. Pick one that catches your eye and have some fun with it!
Airbrushing Cookies
Want to add a little depth, shading, or a pop of color to your Christmas cookies? Airbrushing can take a design from pretty to HO HO HOLY COW! It's perfect for shading around the edges, adding a snowy background, creating a glowing effect, or giving a cookie more dimension. You'll see how I've used it on several of the Christmas cookies above. If you'd like to give this fun technique a try, visit my Airbrushing Cookies tutorial to learn how to get started.
On Prancer…
Projector for Cookies
Got lettering, intricate designs, or a whole sleigh-full of cookies that need matching details? A cookie projector can be your best decorating elf buddy! It projects your design right onto the cookie so you can trace it with a food color marker or icing. It's especially handy for Christmas lettering, detailed ornaments, and making sure those designs look consistent when you're decorating a whole batch. Want to see how I use one and which projector became my favorite? Head over to my Projector for Cookies tutorial and let Rudolph shed a little light on the subject!
Cookie Stenciling
Want to dress up your Christmas cookies without piping every little detail by hand? Stencils to the rescue! They're wonderful for adding snowflakes, delicate patterns, Christmas trees, and other festive designs. You can use royal icing or airbrush color through a stencil to create a crisp design with much less fuss. It's a handy way to add a little extra fa-la-la-la-fabulous to your cookies! Take a peek at the ways Ms. Claus uses stencils in my Cookie Stenciling tutorial to see how it works.
A Sleigh-Full of Christmas Cookie Decorating Ideas!
Well, look at what we've cooked up! From easy-peasy Christmas cookies to designs that really show off your decorating skills, this page is packed with ideas to keep those piping bags busy.
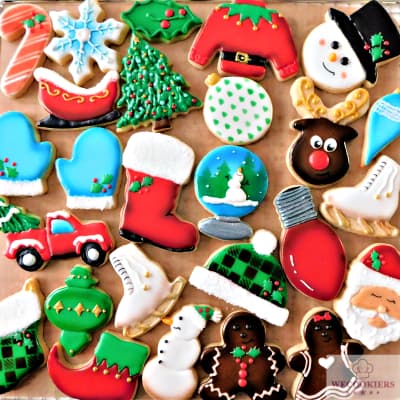
Here's a look at roughly 32 different cookie shapes featured throughout the page. Whether you're just getting started or ready to pull out all the decorating stops, I hope you've found a few designs that make you want to grab some cookies and get decorating!
After all, Christmas only comes once a year… and that's no reason to stop at just one cookie! 😉🎄
Christmas Cookie Tips & Tricks
Christmas cookie decorating is fun, but when the holiday rush kicks in, a few tricks can make your life a whole lot easier! Here are some of my favorite ways to save time, stay organized, and get those cookies ready for Santa. 🎅
1. Save Time by Decorating Similar Cookies Together
When the holiday season rolls around, things get busy in a hurry! Doing everything you can to save time can be critical. If you're in the same sleigh, here's a cookie-decorating tip: Spread all the same-shaped cookies out on a rack or pan. Choose one decorating bag and use it on every cookie that needs that color before putting the bag down and switching to another.
Constantly picking up and putting down different colors wastes time. And Santa is in a hurry, remember!
2. Make a List of Your Icing Colors and Consistencies
Here's another pro tip: Christmas cookies often require lots of colors and icing consistencies. That's one reason the whole process can take so long.
Streamline your work by writing down every color you need, what you'll use it for, and the consistency required. Sometimes you may need three different consistencies of the very same color! A little planning ahead can save you a lot of head-scratching later.
3. Put a Food Dehydrator on Your Christmas Wish List
Still in a hurry? Let me tell you about the number one piece of equipment I couldn't do without: a food dehydrator.
Seriously, it can cut drying time from waiting overnight to just 10 minutes! Now that's a time saver. It has paid for itself over and over again.
If you're ready to join Mrs. Claus's cookie team, this is a must-have. And no, your sugar cookies will NOT dry out!
4. Get Perfectly Round Cookies in a Flash
If you're making round cookies, let me share this amazing, fast tip. Have a glass with an opening about the same size as your cookies? Great!
As soon as you take the baking sheet out of the oven, carefully place the glass over each warm cookie and move it in a small circular motion. Work quickly before the cookies cool!
Ta-dah! Beautifully round cookies without having to fuss over every edge. Just be careful—the cookies and baking sheet are hot!
5. Keep Your Sugar Cookies Fresh for the Holidays
To Freeze or Not to Freeze. That Is the Question!
Finished decorating your cookies sooner than expected? Maybe you have five days before the event or pickup day. Should you freeze them, or will they dry out? Freezing can be an option, but results may vary depending on your recipe, icing, packaging, and storage conditions. If you do freeze them, let the container come to room temperature before opening it to help prevent condensation from forming on your cookies.
But...
...if you're looking for another way to help keep cookies soft, some bakers place a piece of bread or a few marshmallows in an airtight container with them. Just keep in mind that results can vary, and marshmallows may add a little extra sweetness. As always, test your storage method before the big day!
6. Start With a Royal Icing Recipe You Can Count On
The biggest key to success with decorated sugar cookies is the icing. There's a reason my Supreme Royal Icing recipe has had over 20,000 downloads!
I won't go into all the details here, but you can read more about it and get the recipe on my WeCookier's royal icing page here: Supreme Royal Icing. You won't regret it!
7. How to Make Deep Red Royal Icing
Remember when I mentioned deep red royal icing earlier? Here's how I make it!
No need for a whole lot of extra reading here. I've got my popular How to Make Deep Red Royal Icing video ready for you instead. Let's get that gorgeous Christmas red without all the guesswork!
More Christmas Cookie Inspiration
Now we're ready to pull out some extra tricks and take these Christmas cookies to the next level!
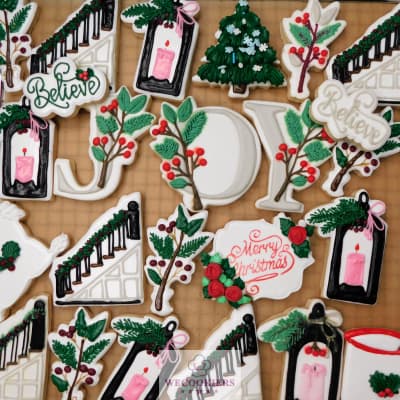
Now here's a Christmas cookie collection dressed up for the holidays! This gorgeous set features intricate designs in a coordinated palette of black, taupe, white, burgundy, and forest green. From an elegant staircase wrapped in piped garland to a cozy Christmas lamp, mistletoe, and a trio spelling out JOY, there's plenty of detail to admire.
Take a closer look at the piping, the little finishing touches, and how a limited color palette brings the whole collection together. Who says Christmas has to be red and green? 😉
Top of Christmas Cookie Decorating Ideas
Look! There are more holiday pages...



Yes! I want join and be a free member. Please send me the WeCookier's Express monthly periodical. It's loaded with cookier information. Get cookie-cutter flips, business tips and hacks, inspo, Q&A, and so much more! You'll be an instant WeCookier!

Recent Articles


-
Projector for Cookies: How to Choose & Use One
Sep 25, 26 08:09 PM
 Learn how to choose and use a projector for cookies with tips from a pro cookie decorator. Make lettering, designs and decorating easier!
-
Sugar Cookies: Learn Decorating and Grow Your Business
Sep 21, 26 01:44 PM
 Learn sugar cookies step by step with recipes, royal icing tips, decorating tutorials, and business guidance to turn your skills into income.
-
Valentine's Day sugar cookies: Red Icing Secrets
Jun 14, 26 08:22 PM
 Valentine's Day sugar cookies made simple with deep red icing tips, cookie cutter flips, design inspiration, and smart ways to sell your sets.